Saturday, September 29, 2012

Grilled Beef Satay

What is it about meat on a stick? It's so much more fun to eat and I can eat twice as much! Yum! This recipe seems somewhat time intensive. I've made it twice now and felt like it took awhile + left a huge mess in my kitchen! It is so good though that I will most likely continue to make it.

(I haven't been able to find lemon grass in muscatine, but it tastes great without it. I have found that 1 can of coconut milk is enough for the Basting sauce & the peanut sauce)

Cooking Tip #3:
If you don't have aluminum skewers, you can use Bamboo skewers. Just be sure to soak them in water for 30 minutes.

Cooking Tip #4:
Don't marinate with Ginger! Fresh ginger contains an enzyme known as zingibain that if left too long on meat, breaks down collagen on the meat's surface, producing the same mealy effect as acids and some juices. Aka: it will make your meat mushy!

Grilled Beef Satay

Basting Sauce
     3/4 cup regular or light coconut milk
     3 Tablespoons packed dark brown sugar
     3 Tablespoons fish sauce
     2 Tablespoons vegetable oil
     3 shallots, minced
     2 stalks lemon grass, trimmed to bottom 6 inches & minced
     2 Tablespoons grated fresh ginger
     1 1/2 teaspoons ground coriander
     3/4 teaspoon red pepper flakes
     1/2 teaspoon ground cumin
     1/2 teaspoon salt

Beef
     2 Tablespoons vegetable oil
     2 Tablespoons packed dark brown sugar
     1 Tablespoon fish sauce
     1 (1 1/2 to 1 3/4 lb) flank steak, halved lengthwise, then sliced on slight angle against grain into    1/4 inch slices.

1. For the Basting Sauce: Whisk all ingredients together in bowl. Reserve 1/3 of sauce in separate bowl. (Use reserved sauce to apply to raw beef)

2. For the Beef: Whisk oil, sugar & fish sauce together in medium bowl. Toss beef with marinade and let stand at room temp for 30 minutes. Weave Beef onto 12-inch metal skewers, 2 pieces per skewer, leaving 1 1/2 inches at top and bottom of skewer exposed. You should have 10 to 12 skewers.

3. For Gas Grill (Let me know if you want Charcoal grill instructions!)
    Turn all burners to high, cover, and heat grill until very hot, about 15 minutes. Leave all burners on high.
4. Clean and oil cooking grate. Place beef skewers on grill perpendicular to grate. Brush meat with 1/3 basting sauce (reserved portion) and cook covered until browned, about 3 minutes. Flip skewers, brush half of remaining basting sauce, and cook until browned on second side, about 3 minutes. Brush meat with remaining basting sauce and cook 1 minute longer. Transfer to large platter and serve with peanut sauce.

Peanut Sauce
    1 Tablespoon vegetable oil
    1 Tablespoon Thai red curry paste
    1 Tablespoon packed dark brown sugar
    2 garlic cloves, minced
    1 Cup regular or light coconut milk
    1/3 Cup chunky peanut butter
    1/4 Cup roasted unsalted peanuts, chopped (I left these out and thought it was still awesome)
    1 Tablespoon lime juice
    1 Tablespoon fish sauce
    1 teaspoon soy sauce

1. Heat oil in small sauce pan over medium heat until shimmering. Add curry paste, sugar, and garlic; cook, stirring constantly until fragrant, about 1 minute.

2. Add coconut milk and bring to a simmer. Whisk in peanut butter until smooth. Remove from heat and stir in peanuts, lime juice, fish sauce, and soy sauce. Cool to room temperature.

~Cooks Illustrated #112

Tuesday, September 11, 2012

Fresh Tomato Sauce with Rosemary and Bacon

As summer begins to wind down I figured I should post this recipe. This sauce is wonderful to make from fresh garden grown tomatoes. I have made it from store bought tomatoes as well, but fresh seem to have a much better flavor.

Cooking Tip #2:
Peeling Tomatoes: 1. Cut a very shallow "x" on the bottom of your tomatoes. 2. Prepare a pot of boiling water and an ice bath. 3. Drop tomatoes in boiling water for no more than 30 seconds. 4. Remove from water and place immediately in ice bath for at least 5 minutes. 5. Peel off the skin with your hands! http://allrecipes.com/howto/peeling-tomatoes/

Fresh Tomato Sauce with Rosemary and Bacon
(Use with 1 lb of a tubular pasta)
  • 6 ounces bacon (6 slices), cut crosswise into 1/2 inch strips
  • 2 medium garlic cloves, minced
  • 1 Tablespoon minced fresh rosemary
  • 1/4 teaspoon hot pepper flakes
  • 3 pounds ripe round tomatoes cored, peeled, seeded, and cut into 1/2 inch pieces
  • 1/2 teaspoon salt
  • 1/8 teaspoon black pepper
  • Granulated sugar
  • Parmesan cheese, for serving 
  1. Cook bacon in 10 inch skillet over medium heat, stirring occasionally, until crisp. Using slotted spoon, transfer bacon to paper towel lined bowl.
  2. Return skillet to medium-high heat. Add Garlic, rosemary and pepper flakes.
  3. Cook stirring constantly until garlic is fragrant, but not browned, about 30 seconds.
  4. Stir in tomatoes and cook until tomato pieces lose their shape to form chunky sauce, about 10 minutes.
  5. Stir in salt, pepper and sugar to taste. Add bacon, Toss sauce with Pasta and serve.
~Cooks Illustrated #82

Tuesday, August 28, 2012

Red Beans and Rice

Beans are one of my least favorite foods. However, Matt loves them, so when I feel like he needs a special dinner I make him Red Beans and Rice. I have never tasted any red beans and rice but my own, so I really don't know if this is a good recipe, but Matt eats it all up so it can't be horrible :-D This recipe is not too difficult, it does take some time (about 1.5 hours of cook time) but most of that is just giving the beans time to cook. I usually brine my beans overnight, so you do need a little planning for this. I think I'm going to try and start adding some cooking tips into my blog. So, here it is:

Cooking Tip #1:
If you are pressed for time you can "quick brine" your beans. Combine the salt, water and beans in a large dutch oven and bring to a boil over high heat. Remove the pot from the heat, cover and let stand 1 hour. Drain and rinse the beans and proceed with your recipe!

And here is the recipe:

Red Beans and Rice

For the Beans
Salt
1 pound small red beans (about 2 cups), rinsed
4 slices of bacon, chopped fine
1 medium onion, chopped fine (about 1 cup)
1 small green bell pepper, seeded and chopped fine (about 1/2 cup)
1 celery rib, chopped fine (about 1/2 cup)
3 medium garlic cloves, minced
1 teaspoon fresh thyme leaves (or 1/2 teaspoon dried)
1 teaspoon sweet paprika
2 bay leaves
1/4 teaspoon cayenne pepper
Ground black pepper
3 cups chicken broth
6 cups water (3 Pints)
8 ounces andouille sausage, halved lengthwise and cut into 1/4 inch slices (this kind of sausage is spicy)
1 teaspoon red wine vinegar, plus extra for seasoning
3 scallions, white and green parts, sliced thin
Hot sauce, for serving

For the Rice
2 cups long-grain white rice
1 tablespoon unsalted butter or vegetable oil
3 cups water
1 teaspoon table salt

Beans

  1. Dissolve 3 tablespoons salt in 4 qts cold water in large bowl or container. Add beans and soak at room temperature for at least 8 hours and up to 24 hours. Drain and rinse well.
  2. Heat bacon in large Dutch oven over medium heat, stirring occasionally, until browned and almost fully rendered, 5 to 8 minutes.
  3. Add onion, green pepper, and celery; cook stirring frequently, until vegetables are softened, 6 to 7 minutes.
  4. Stir in garlic, thyme, paprika, bay leaves, cayenne pepper, and 1/4 teaspoon black pepper; cook until fragrant, about 30 seconds.
  5. Stir in beans, broth, and water; bring to boil over high heat. Reduce heat and vigorously simmer, stirring occasionally, until beans are just soft and liquid begins to thicken 45 to 60 minutes.
  6. Stir in sausage and 1 teaspoon red wine vinegar and cook until liquid is thick and beans are fully tender and creamy, about 30 minutes.
  7. Season to taste with salt, black pepper, and additional red wine vinegar.
  8. Serve over rice, sprinkling with scallions and passing hot sauce separately.

Rice (I usually start this during step 6 of the beans)

  1. Place rice in colander or fine-mesh strainer and rinse under cold running water until water runs clear.
  2. Heat butter or oil in large saucepan over medium heat. Add rice and cook, stirring constantly until grains become chalky and opaque, 1 to 3 minutes.
  3. Add water and salt, increase heat to high and bring to boil, swirling the pot to blend ingredients.
  4. Reduce heat to low, cover and simmer until all liquid is absorbed, 18 to 20 minutes.
  5. Off heat, remove lid and place kitchen towel folded in half over saucepan; replace lid. Let stand 10 to 15 minutes; fluff with fork and serve.

~Cooks Illustrated #102


Saturday, July 28, 2012

Individual Baked Oatmeal

Once upon a time, when I had one child, I actually made fun breakfasts... We'd rotate between bagels, scrambled eggs, hard boiled eggs, oatmeal, and grits (and sometimes, I'd even make biscuits from scratch!). Now, with 3 children (4 and under...) mornings seem like a crazy grumpy time. The baby wants to be fed, the 4 year old is saying she's starving, and the 2 year old is busy picking out a warm winter outfit that he insists on wearing (on a 100 degree day no less). So when I found a recipe for individual baked oatmeal I thought it was such an awesome idea. Now we have something to break the monotony of the bowls of cereal! I had to buy a large thing of heavy cream for a pasta recipe (they were all out of the small things), so we've been eating our baked oatmeal with warm cream and my homemade peach spice honey. I haven't tried it yet, but the recipe claims you can freeze them and reheat as needed, which makes the idea even more awesome for us busy moms!

Individual Baked Oatmeal

2 large eggs
1 T vanilla
1 C unsweetened applesauce
1 C maple syrup
1 ripe banana, mashed
1 C blueberries
5 C old fashioned quick oats
1 teas. salt
3 teas. baking powder
1/4 C ground flax seed
1 T cinnamon
2 1/2 C skim milk

1. Preheat oven to 350. Line 24 muffin cups with liners and spray with non-stick cooking spray.
2. In a large bowl, mix eggs, vanilla, applesauce and maple syrup together. Add the banana and blueberries.
3. In a separate bowl, mix together oats, salt, baking powder, flax seed and cinnamon. Add milk to dry mixture.
4. Combine oatmeal mixture with egg mixture. Fill muffin cups.
5. Bake 35 to 40 minutes or until set. Best eaten warm with milk served on top.

~Hyvee Seasons, Volume 6, Issue 4

Monday, June 25, 2012

Memories...


Food and memories seem to go together. Whenever I have a jalapeno popper I always think of the end of my pregnancy with Evie :) Whenever I dip my french fries in mayonnaise I think of my travelling in the Netherlands. Whenever I make a silver white cake with chocolate chips I think of my last year in college and how our apartment's heater didn't work. It was so cold that fluffy light cake seemed like a pound cake (I miss you Anna and Laura and Amanda!). I could go on and on... Whenever I make Honey Hoisen pork tenderloin I remember how Ashley made it for us one of the times we came over to their apartment in 2006. And how that stupid pork just wouldn't cook! Until we realized the oven wasn't turned on :-D Ashley and Eric were some of our first friends when we moved to Muscatine. We have had a ton of fun times with them: beer pong, played with a tiny bouncy ball in their tiny apartment, late nights of playing settlers, Ashley super gluing her finger to her toe, singing karaoke... Just recently they moved from Muscatine and we already miss them! So, I will make this recipe and remember them (I'll just try to be sure to turn the oven on!)

Honey Hoisen Pork Tenderloin

2 Tablespoons sliced green onions
2 Tablespoons hoisin sauce
2 Tablespoons soy sauce
2 Tablespoons sage (or clover) honey
1 Tablespoon hot water
2 garlic cloves, minced
1 lb Pork Tenderloin, trimmed
1/4 teaspoon salt
1/2 teaspoon sesame seeds       

1. Combine first 6 ingredients in a small bowl. Pour 1/4 cup of mixture into ziplock bag with pork. Reserve rest of marinade. Refrigerate pork 30 minutes.
2. Preheat oven to 400 degrees.
3. Remove Pork from bag. sprinkle with salt. Heat a skillet over medium heat. Coat pan with cooking spray. Add pork, brown on all sides.
4. Brush with 1 Tablespoon of marinade. Sprinkle with sesame seeds. Place Pork on cookie sheet and bake for 20 minutes.
5. Drizzle pork with remaining marinade and serve sliced.                              

Wednesday, June 13, 2012

Sichuan Pork & Menu Planning Apps

I recently discovered the awesomeness of a menu planning app. This app lets me input recipes on my computer and then will sinc the recipes with the app on my phone. Then I can set my menu plan up and then it will add the ingredients I need to my grocery list. The name of this oh so awesome app is Pepperplate. I even had Matt download it so he can see our weeks menu if he is wondering what's for dinner, or if he needs to add something to my grocery list. I feel as though I have entered the technological age! No more grocery lists on pieces of paper that get lost in my purse or left at home! Now I just have to worry about dropping my phone... I'm also currently in the process of typing up all my recipes (which should make it easier to blog about them!).

Last week I realized I hadn't tried out any new recipe's in awhile (my excuse: 3 children :-)). I decided to attempt Sichuan Stir-Fried Pork in a garlic sauce from my cooks illustrated magazines (I LOVE this magazine btw). It didn't take too long to throw together & turned out awesomely! I was a little worried about the pork (you soak it in baking soda???) but it turns out very tender and tastes great. So, if you're feeling adventurous here's a yummy pork dish:

Sichuan Stir-Fried Pork in a Garlic Sauce

Ingredients

Sauce
1/2 cup chicken broth
2 tablespoons sugar
2 tablespoons soy sauce
4 teaspoons Chinese black vinegar (2 teaspoons balsamic vinegar & 2 teaspoons rice vinegar)
1 tablespoon toasted sesame oil
1 tablespoon Chinese rice wine or dry sherry
2 teaspoons ketchup
2 teaspoons fish sauce                                   
2 teaspoons corn starch 

Pork       
12 oz boneless country-style pork ribs, trimmed
1 teaspoon baking soda                                   
1/2 cup cold water
2 teaspoons Chinese rice wine or dry sherry
2 teaspoons cornstarch                           
Stir-Fry
4 garlic cloves, minced
2 scallions, white parts minced, green parts sliced thin
2 tablespoons Asian broad-bean chili paste (or Sriracha sauce, cut back on this a lot if you don't want spicy)
4 tablespoons vegetable oil
6 oz shitake mushrooms, stemmed and sliced thin
2 celery ribs, cut on bias into 1/4 inch slices

 Instructions

  • For the Sauce

    1. Whisk all ingredients together in a bowl; set aside.
  • For the Pork

    1. Cut pork into 2 inch lengths, then cut each length into 1/4 inch matchsticks.
    2. Combine pork with baking soda and water in bowl.
    3. Let sit at room temperature for 15 minutes.
    4. Rinse pork in cold water. Drain well and pat dry with paper towels. Whisk rice wine and cornstarch in bowl. Add pork and toss to coat.
  • For the Stir-Fry

    1. Combine garlic, scallion whites & chili paste in bowl.
    2. Heat 1 tablespoon oil in Wok over high heat until just smoking. Add mushrooms and cook, stirring frequently, until tender, 2 to 4 minutes. Add celery and continue to cook until celery is crisp-tender, 2 to 4 minutes. Transfer vegetables to separate bowl.
    3. Add remaining 3 tablespoons oil to now-empty wok and place over medium-low heat. Add garlic-scallion mixture ad cook, until fragrant, about 30 seconds.
    4. Transfer 1 tablespoon garlic-scallion oil to small bowl and set aside.
    5. Add pork to wok and cook, stirring frequently, until no pink remains, 3 to 5 minutes.
    6. Whisk sauce mixture to recombine and add to wok. Increase heat to high and cook, stirring constantly, until sauce is thickened and pork is cooked through, 1 to 2 minutes.
    7. Return vegetables to wok and toss to combine. Transfer to serving platter, sprinkle with scallion greens and reserved garlic-scallion oil, and serve over steamed white rice.

Tuesday, May 29, 2012

Summer Travels and Pico

With the passing of Memorial Day my summer has officially begun. Every year we begin our summer with memorial day travels (never invite us to a cook out, we won't be in town!). We are either in Florida with my family or in Harper's Ferry with Matt's family. And since I like to travel during the summer I find it to be an excellent way to start things off :)

This year we were in Harper's Ferry. Our first mini vacation with 3 kids! Evie & Laurence enjoyed boating, swimming in the pool & getting more candy than any child should have at the memorial day parade (why is it that every parade in Iowa has to have at least 50 tractors in it???). Aria enjoyed dozing by the pool :) Mommy enjoyed boating, reading, tanning (okay, burning), and a slightly crazy girls night with her sister in law. What a wonderful way to begin the summer!

My lovely sister in law, Jenni, made us some wonderful Pico De Gallo to snack on over the weekend and I decided I needed to figure out a recipe for it! I like it better than normal salsa because I feel so healthy eating it :) So, here is the recipe I threw together today, one of the things I love about this is that you can change it up as much as you want!

Pico De Gallo
                                   
  • 1/2 Red Onion, chopped
  • 1/2 Green Pepper, chopped
  • 1/2 Can Corn
  • 1/2 jalapeno, deseeded & minced                                   
  • 2 Cloves Garlic, minced
  • Cilantro, minced
  • 1/2 teaspoon Salt
  • 1 lime, juiced 
  • 4 Roma Tomatoes, cored, deseeded & chopped                                  

  • Combine everything and enjoy!

    Sunday, May 20, 2012

    Orzo? For Sale? Or So? Or is though?

    Well, I just had a baby. Okay, not just, about 7 weeks ago :) Things have been crazy! So crazy in fact that Laurence managed to dump a water bottle full of water on my phone. So now I have a new phone. It's pretty and purple and has some kind of cool name (something like Electric, Fire, or Rhyme) It also has this totally awesome feature: I can now dictate text messages, emails, facebook statuses, etc! This has provided me with loads of entertainment. I recently attempted to send the following text: "No gyro stand..." (I had been told that there was a man selling gyros at our local farmers market) It ended up looking like: "No year o stands. period." It also doesn't seem to recognize the word Orzo, it thought I was saying everything from "For Sale" to "Or so"... This made my weekly menu planning on my spiffy new phone on my spiffy new menu planning app amusing :) So, here is a recipe for "Or is though". Evie and Laurence love this recipe :)

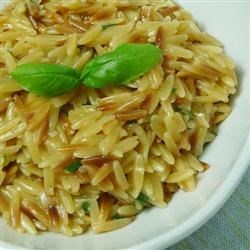
    Orzo with Parmesan and Basil

    • 2 tablespoons butter
    • 1 cup uncooked orzo pasta
    • 1 (14.5 ounce) can chicken broth
    • 1/2 cup grated Parmesan cheese
    • 1/4 cup chopped fresh basil
    • salt and pepper to taste
    • 2 tablespoons chopped fresh basil

    1. Melt butter in heavy skillet over medium-high heat. Stir in orzo and saute until lightly browned.
    2. Stir in chicken stock and bring to boil. Cover. Reduce heat and simmer until orzo is tender and liquid is absorbed, about 15 - 20 minutes.
    3. Mix in Parmesan cheese and basil. Season with salt and pepper. Transfer to shallow bowl. Garnish with basil sprigs.                 
    http://allrecipes.com/recipe/orzo-with-parmesan-and-basil/detail.aspx?event8=1&prop24=SR_Title&e11=orzo%20and%20basil&e8=Quick%20Search&event10=1&e7=Home%20Page